Skip to content
Create WordPress Websites on the fly

Plugin Installation ?

Please note!
You can use our installation service in 2 ways.
If you have your own WordPress website you can install websites using our plugin. You can also install websites using a Zapier workflow. You do not need a plugin for this.
Please read the Zapier documentation if you want to install websites e.g. from your CRM, marketing software, form service or any other app.

Time Needed: 30 minutes

Total Cost:

Things Needed ?

- A WordPress Website.
- Your website must be accessible via the Internet. Our system works through the REST API interface of your WordPress site. It does not work on offline installed sites.

Step by step:

Step 1 : Search, Install & activate the Plugin

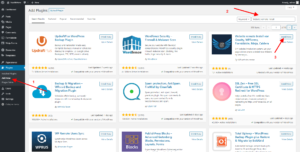
Go to the "Plugins" section on your WordPress site, search for "Website remote Install" or "wp website creator" and click install
Step 2 : Enter your client id, client secret and username

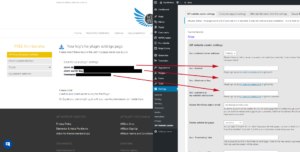
Go to the "Settings -> WP Website Creator" section and enter your login details. You can find the credentials in your wp-website-creator backend
Email template for the access data email

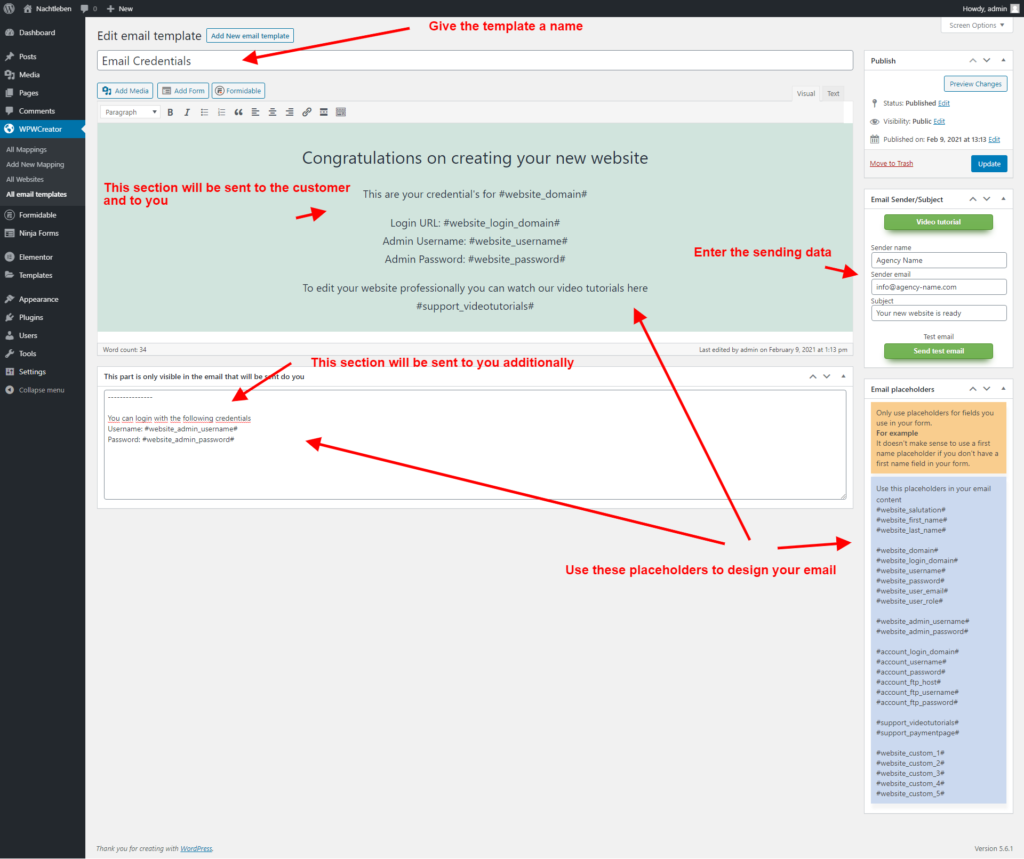
As soon as your website is created, your customer will receive an email with the access data. You can design this email yourself.

Step by step:

Step 1 : Add a new template

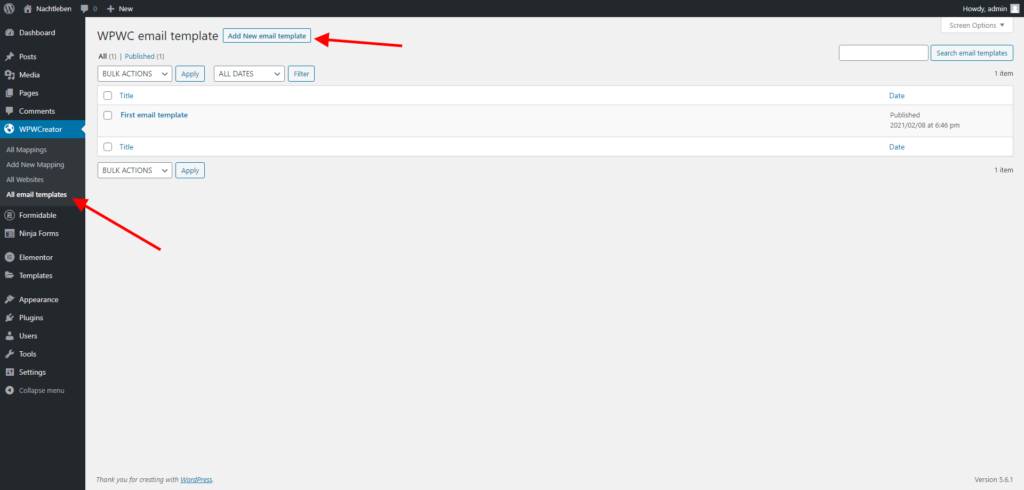
In the "WPWCreator" section, go to "All Email Templates" and click on "Add New email template".
Step 2 : Set up the template with the placeholders
  • Give the template a name
  • Enter the email content
  • Enter the content that will be sent only to you
  • Enter the sending data
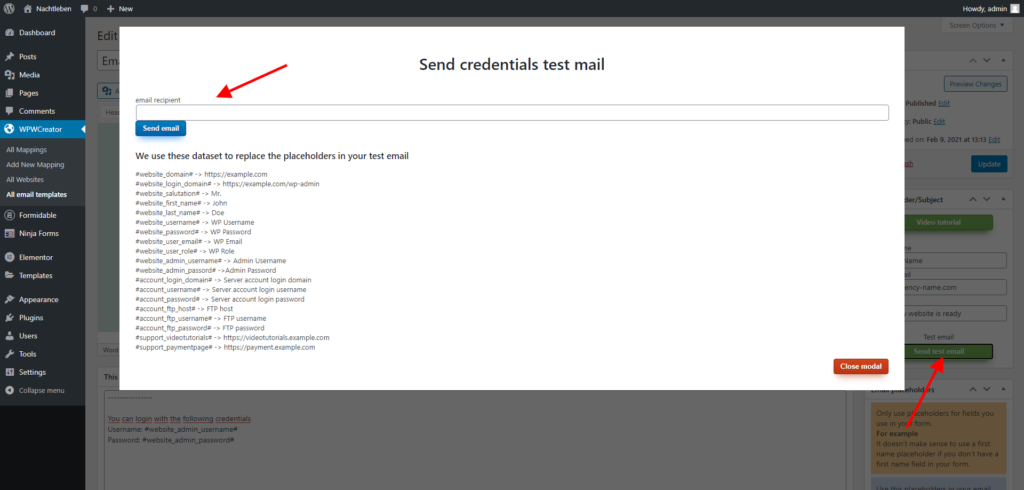
Step 3 : Test Email

Send a test email to yourself to see how the email looks like
Ninja

Set Up Ninja Form!

You can use 5 different form plugins to work with our system. Here is the explanation for Ninja Forms

Step by step with Ninja forms:

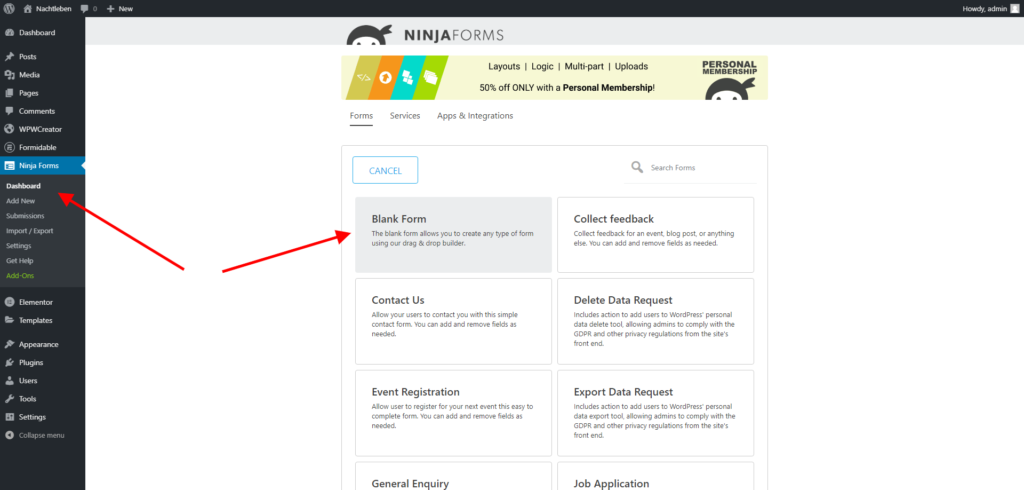
Step 1 : New Form "Click to enlarge the image"

Go to the Ninja Form section and create a new form

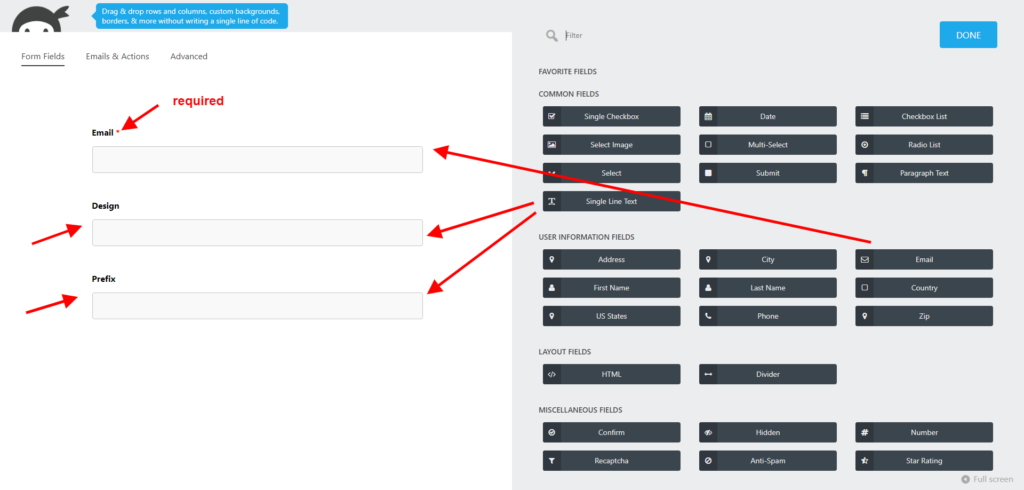
Step 2 : Include Fields

You need at least 3 fields to install a website.

  • Email, Design, Prefix
  • Drag these 3 fields into your form.
  • For the Email field select required
  • The other fields must not be selected as required. These fields will be automatically hidden later
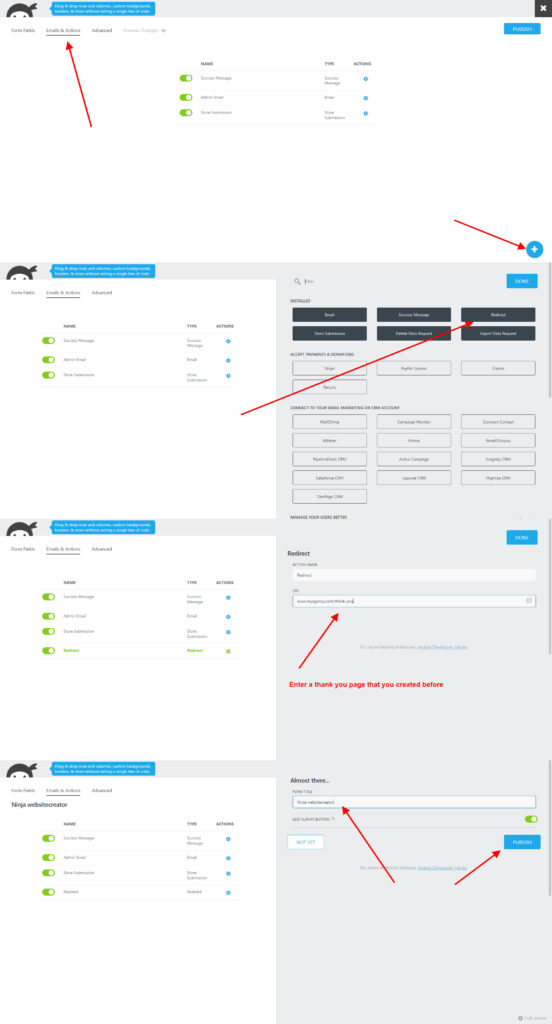
Step 3 : Add a redirect action

To redirect the form to a dane page after submitting it, you need to create a redirect.

  • Go to Emails & Actions and click on the Plus Icon
  • Click on the Redirect button
  • Enter a page as thank you page. You have to create this page before.

Gravity

Set Up Gravity Form

So to get started, you will just need to drag-n-drop the How-to module in the Beaver Builder editor.
The How-to module can basically be used on How-to pages which contains a How-to in their title and contains steps to achieve certain requirements.

step by step:

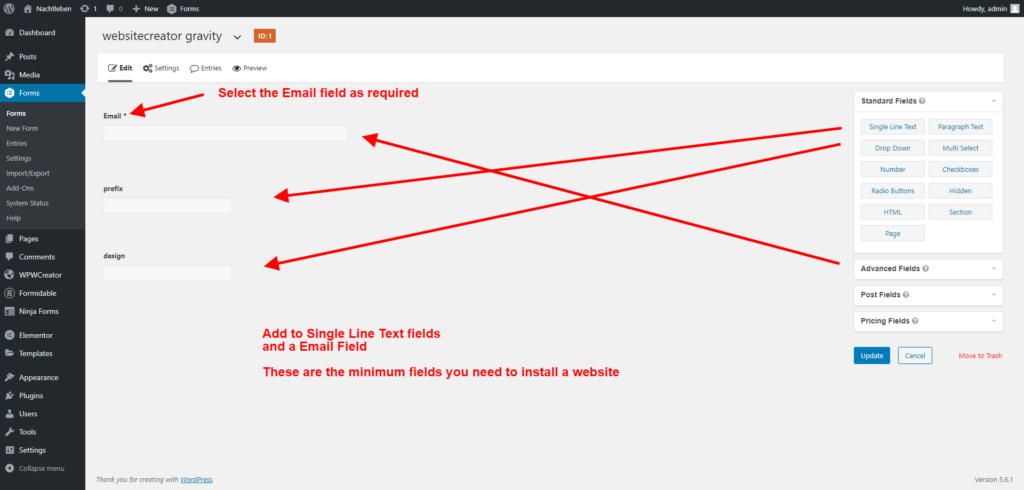
Step 2 : Add fields
  • For the form to work you need to insert at least 3 fields. Email, Prefix and Design
  • Select the email field as required
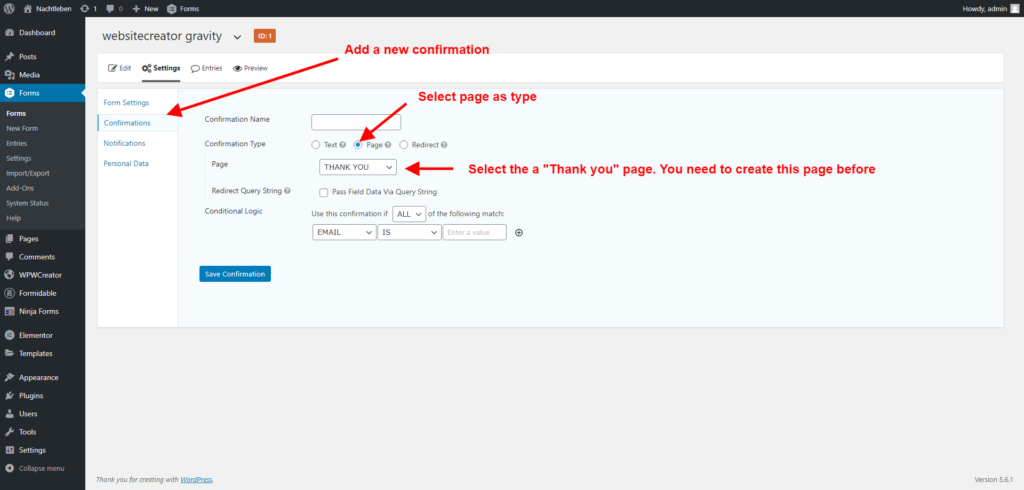
Step 3 : Add a redirect confirmation
  • Klick on settings -> confirmation
  • Select Pahe as confirmation type
  • Select a page that you create before. For example "Thank you"
  • Save the form

Contact 7

Set Up Contact Form 7

Follow this step by step guide to create a form with contact form 7 that can install websites.

Step by step

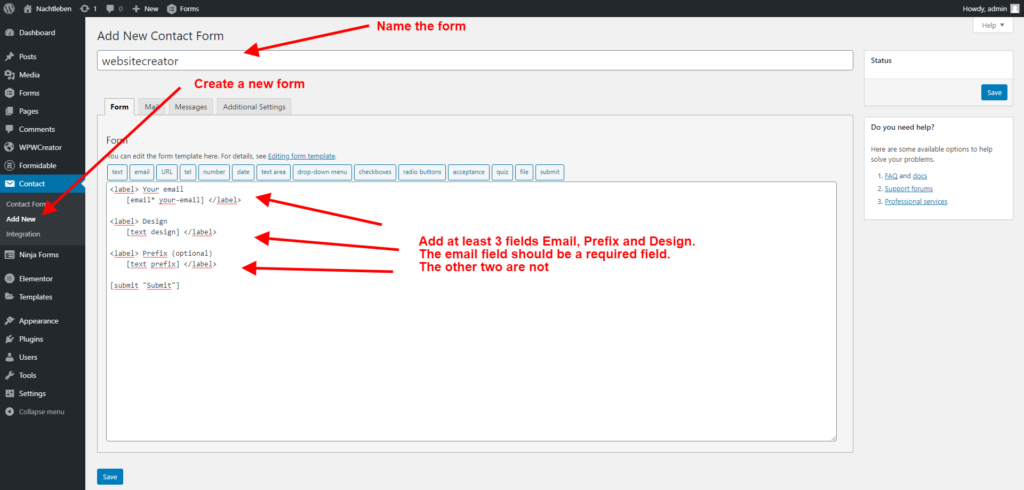
Step 1 : Enter the HowTo schema title you want. "Click to enlarge the image"
  • Create a new form
  • Name the form
  • Add at least 3 fields Email, Prefix and Design. The email field should be a required field. The other two are not

Formidable

Set up formidable

In this article we will show you how to set up a formidable form to be able to install web pages with it.

Step by step:

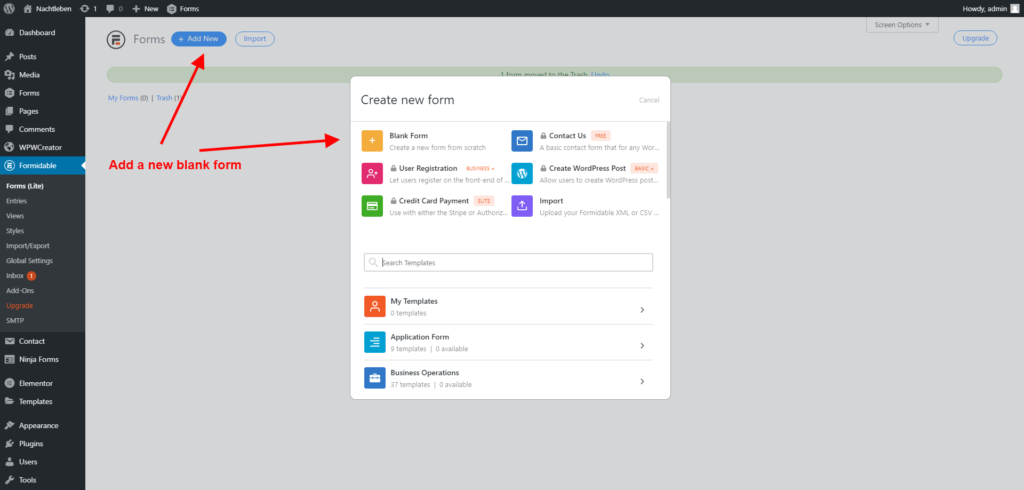
Step 1 : Create a new form "Click to enlarge the image"

Click on "Formidable" and "+Add New" to create a new blank form

Step 2 : Add fields
  • You need to add at least 3 fields to create web pages with a formidable form
  • Select the Email field as required, the other two fields should not be required
Step 3 : Create a redirect action
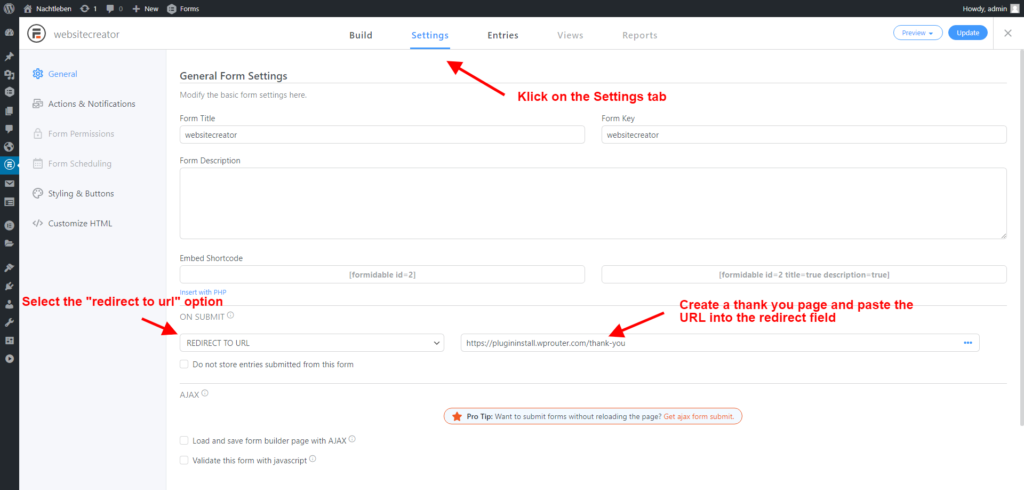
  • Click on the Settings tab
  • Select the "redirect to url" option
  • Create a thank you page and paste the URL into the redirect field

WPForms

Set up a WPForm

In this article we will show you how to set up a WPForm to be able to install web pages with it.

Step by step:

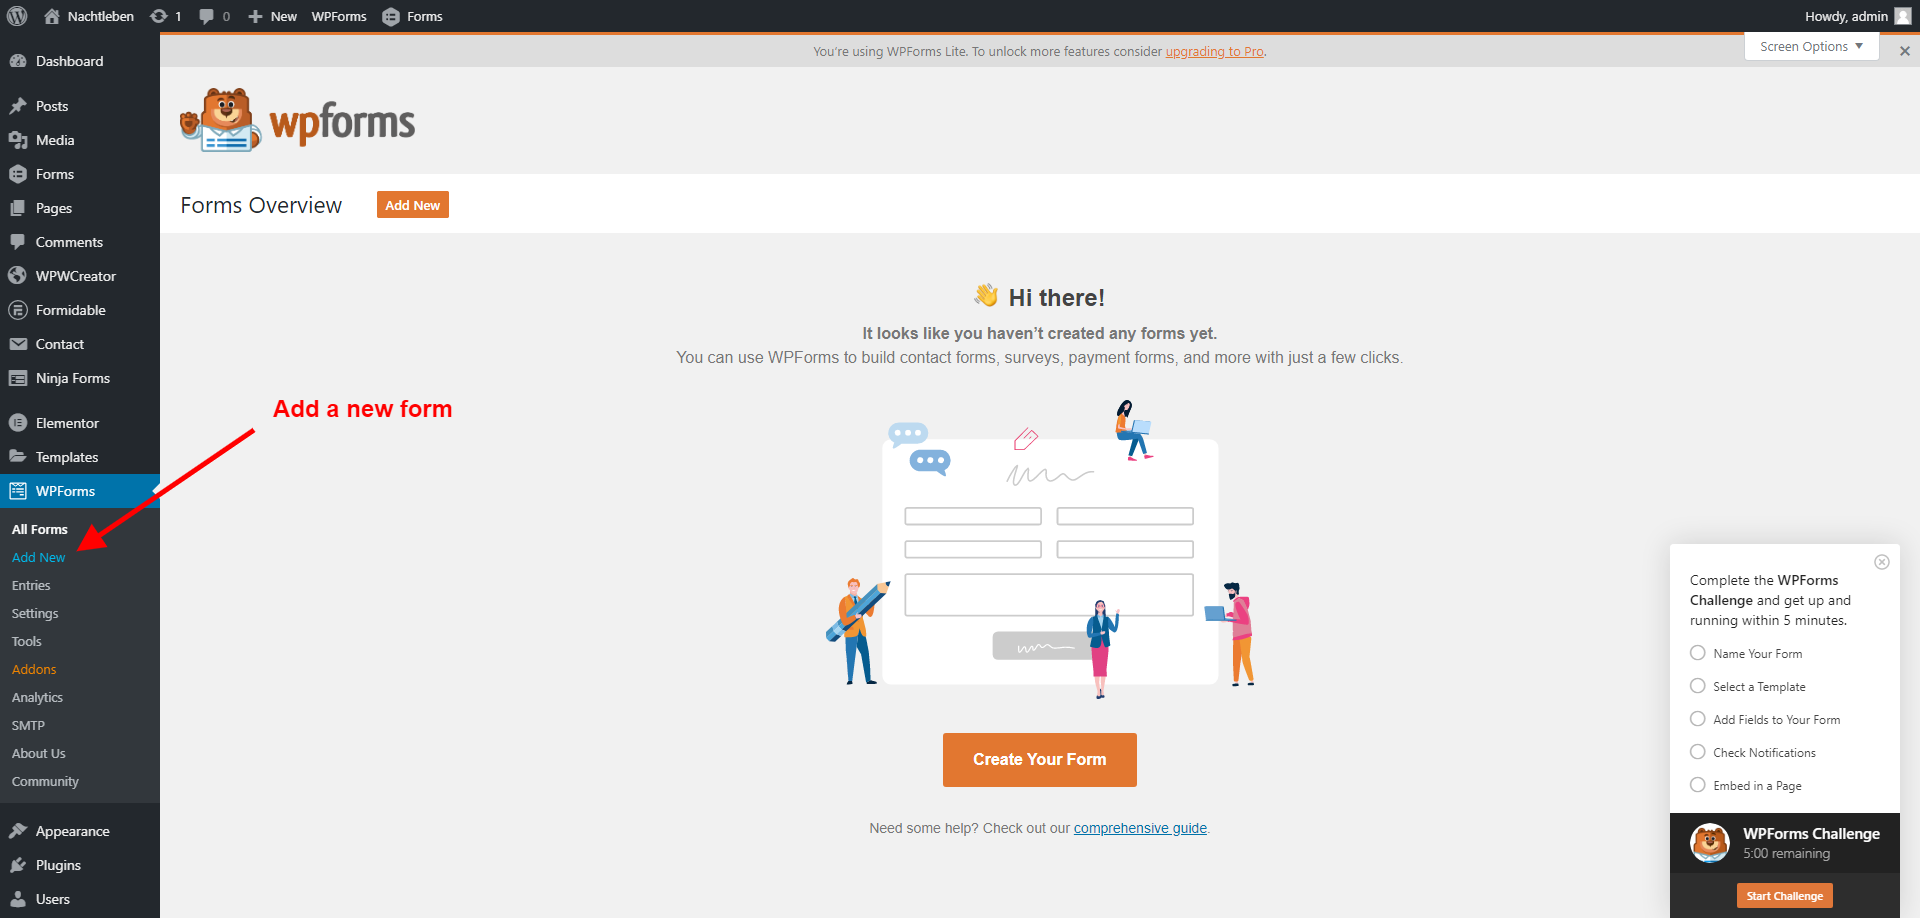
Step 1 : Create a new form "Click to enlarge the image"

Click on "WPForms" and "Add New" to create a new form

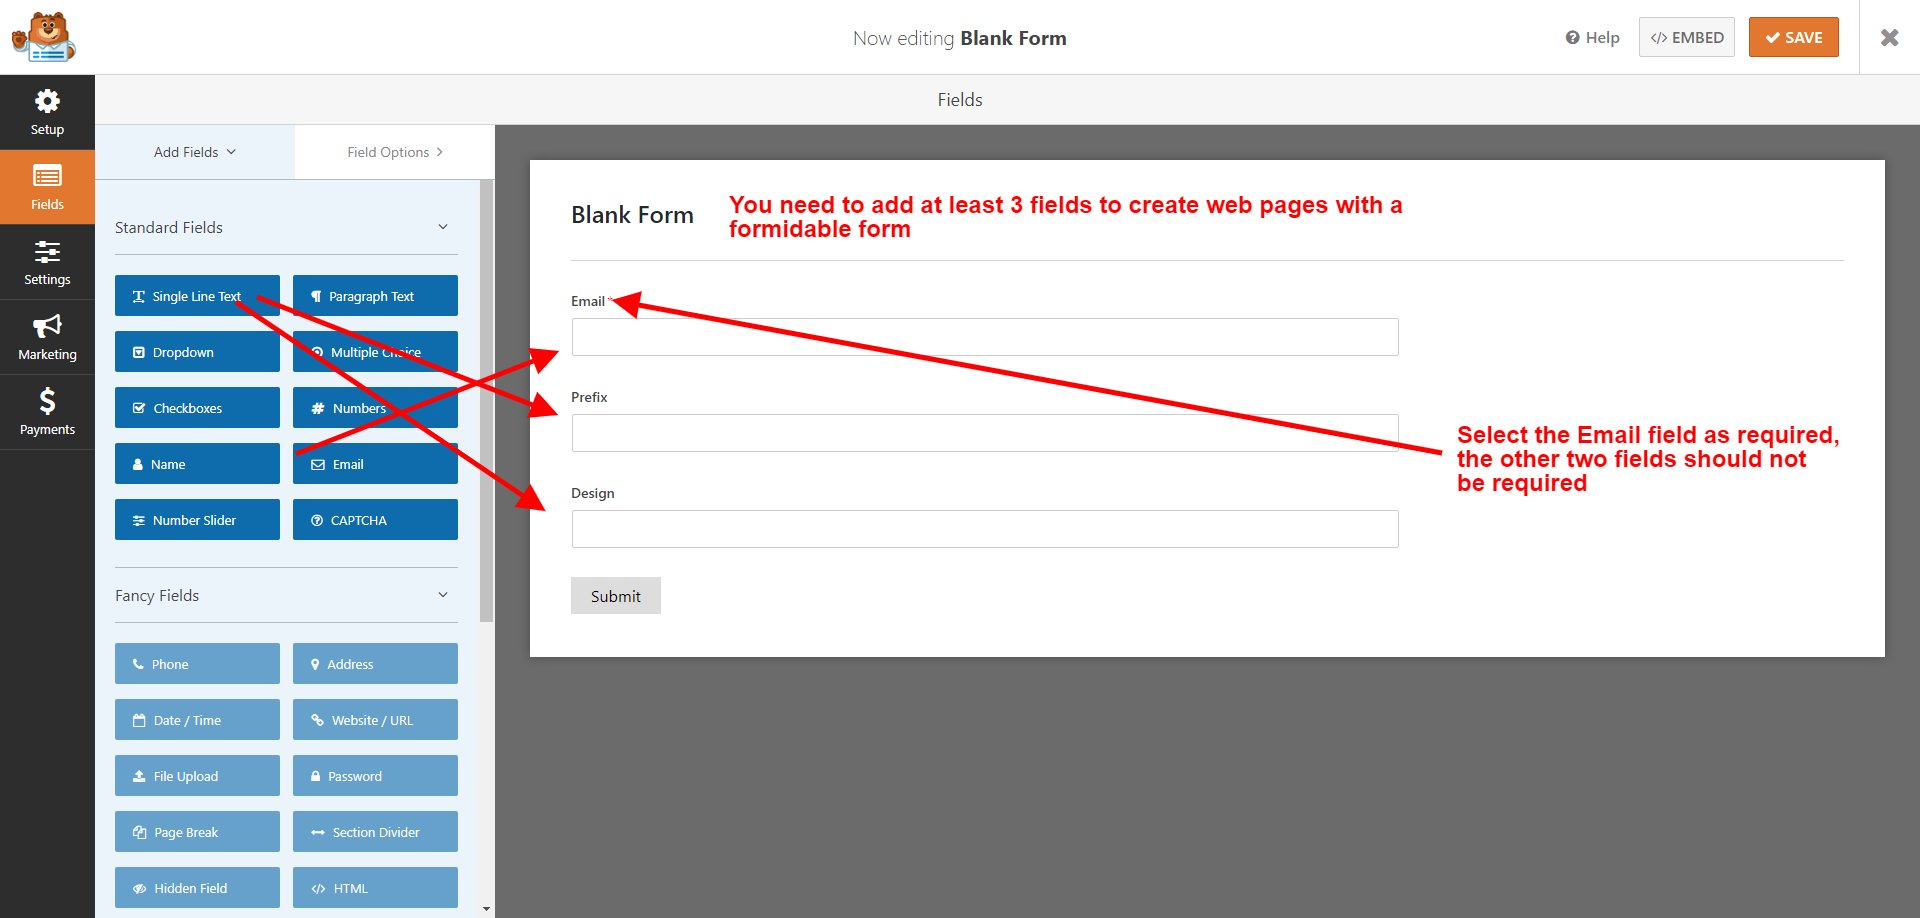
Step 2 : Add Fields

You need to add at least 3 fields to create websites with a WPForm form

Select the Email field as required, the other two fields should not be required

Step 3 : Set up a redirect action
  • Click on the Settings tab and on Confirmation
  • Select the "Go to url (redirect)" option
  • Create a thank you page and paste the URL into the redirect field

Caldera

Set up with Caldera forms

This article describes how to set up a Caldera form to be able to install web pages with it.

Step by step:

Step 1 : Formular erstellen

Click on Caldera -> Forms and on New Form

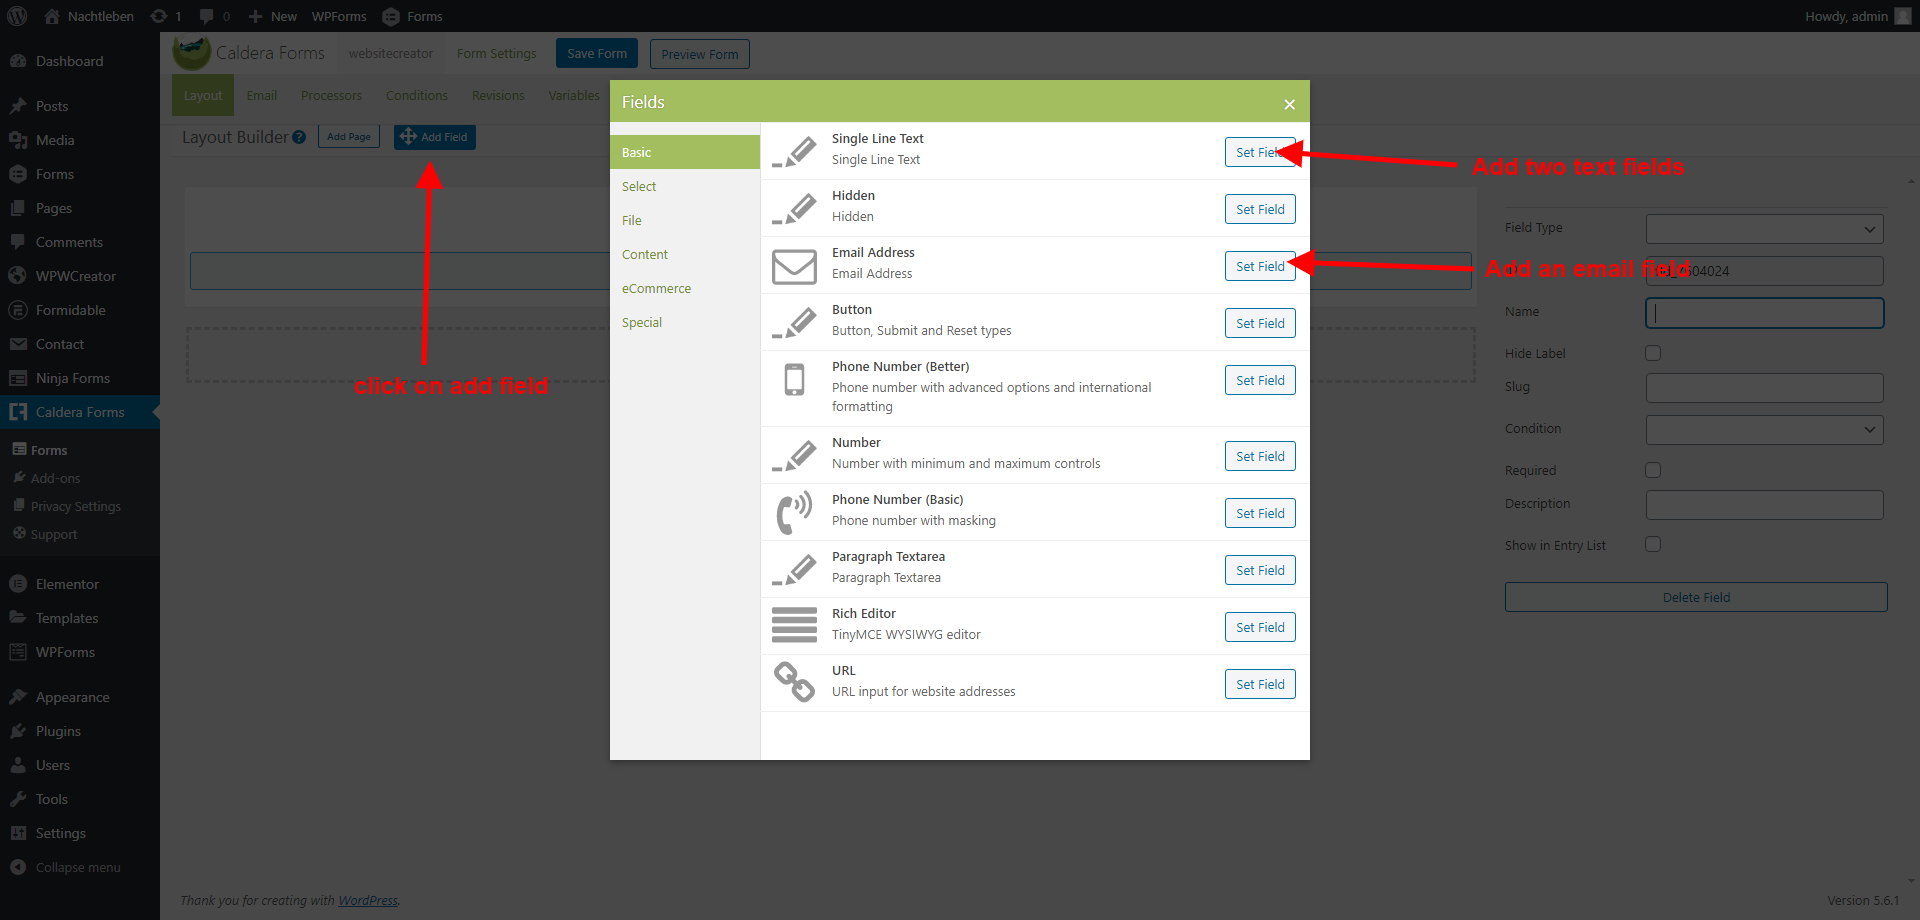
Step 2 : Add Fields

Add two text fields and one email field

The other two fields are not required. They will be automatically hidden in the form.

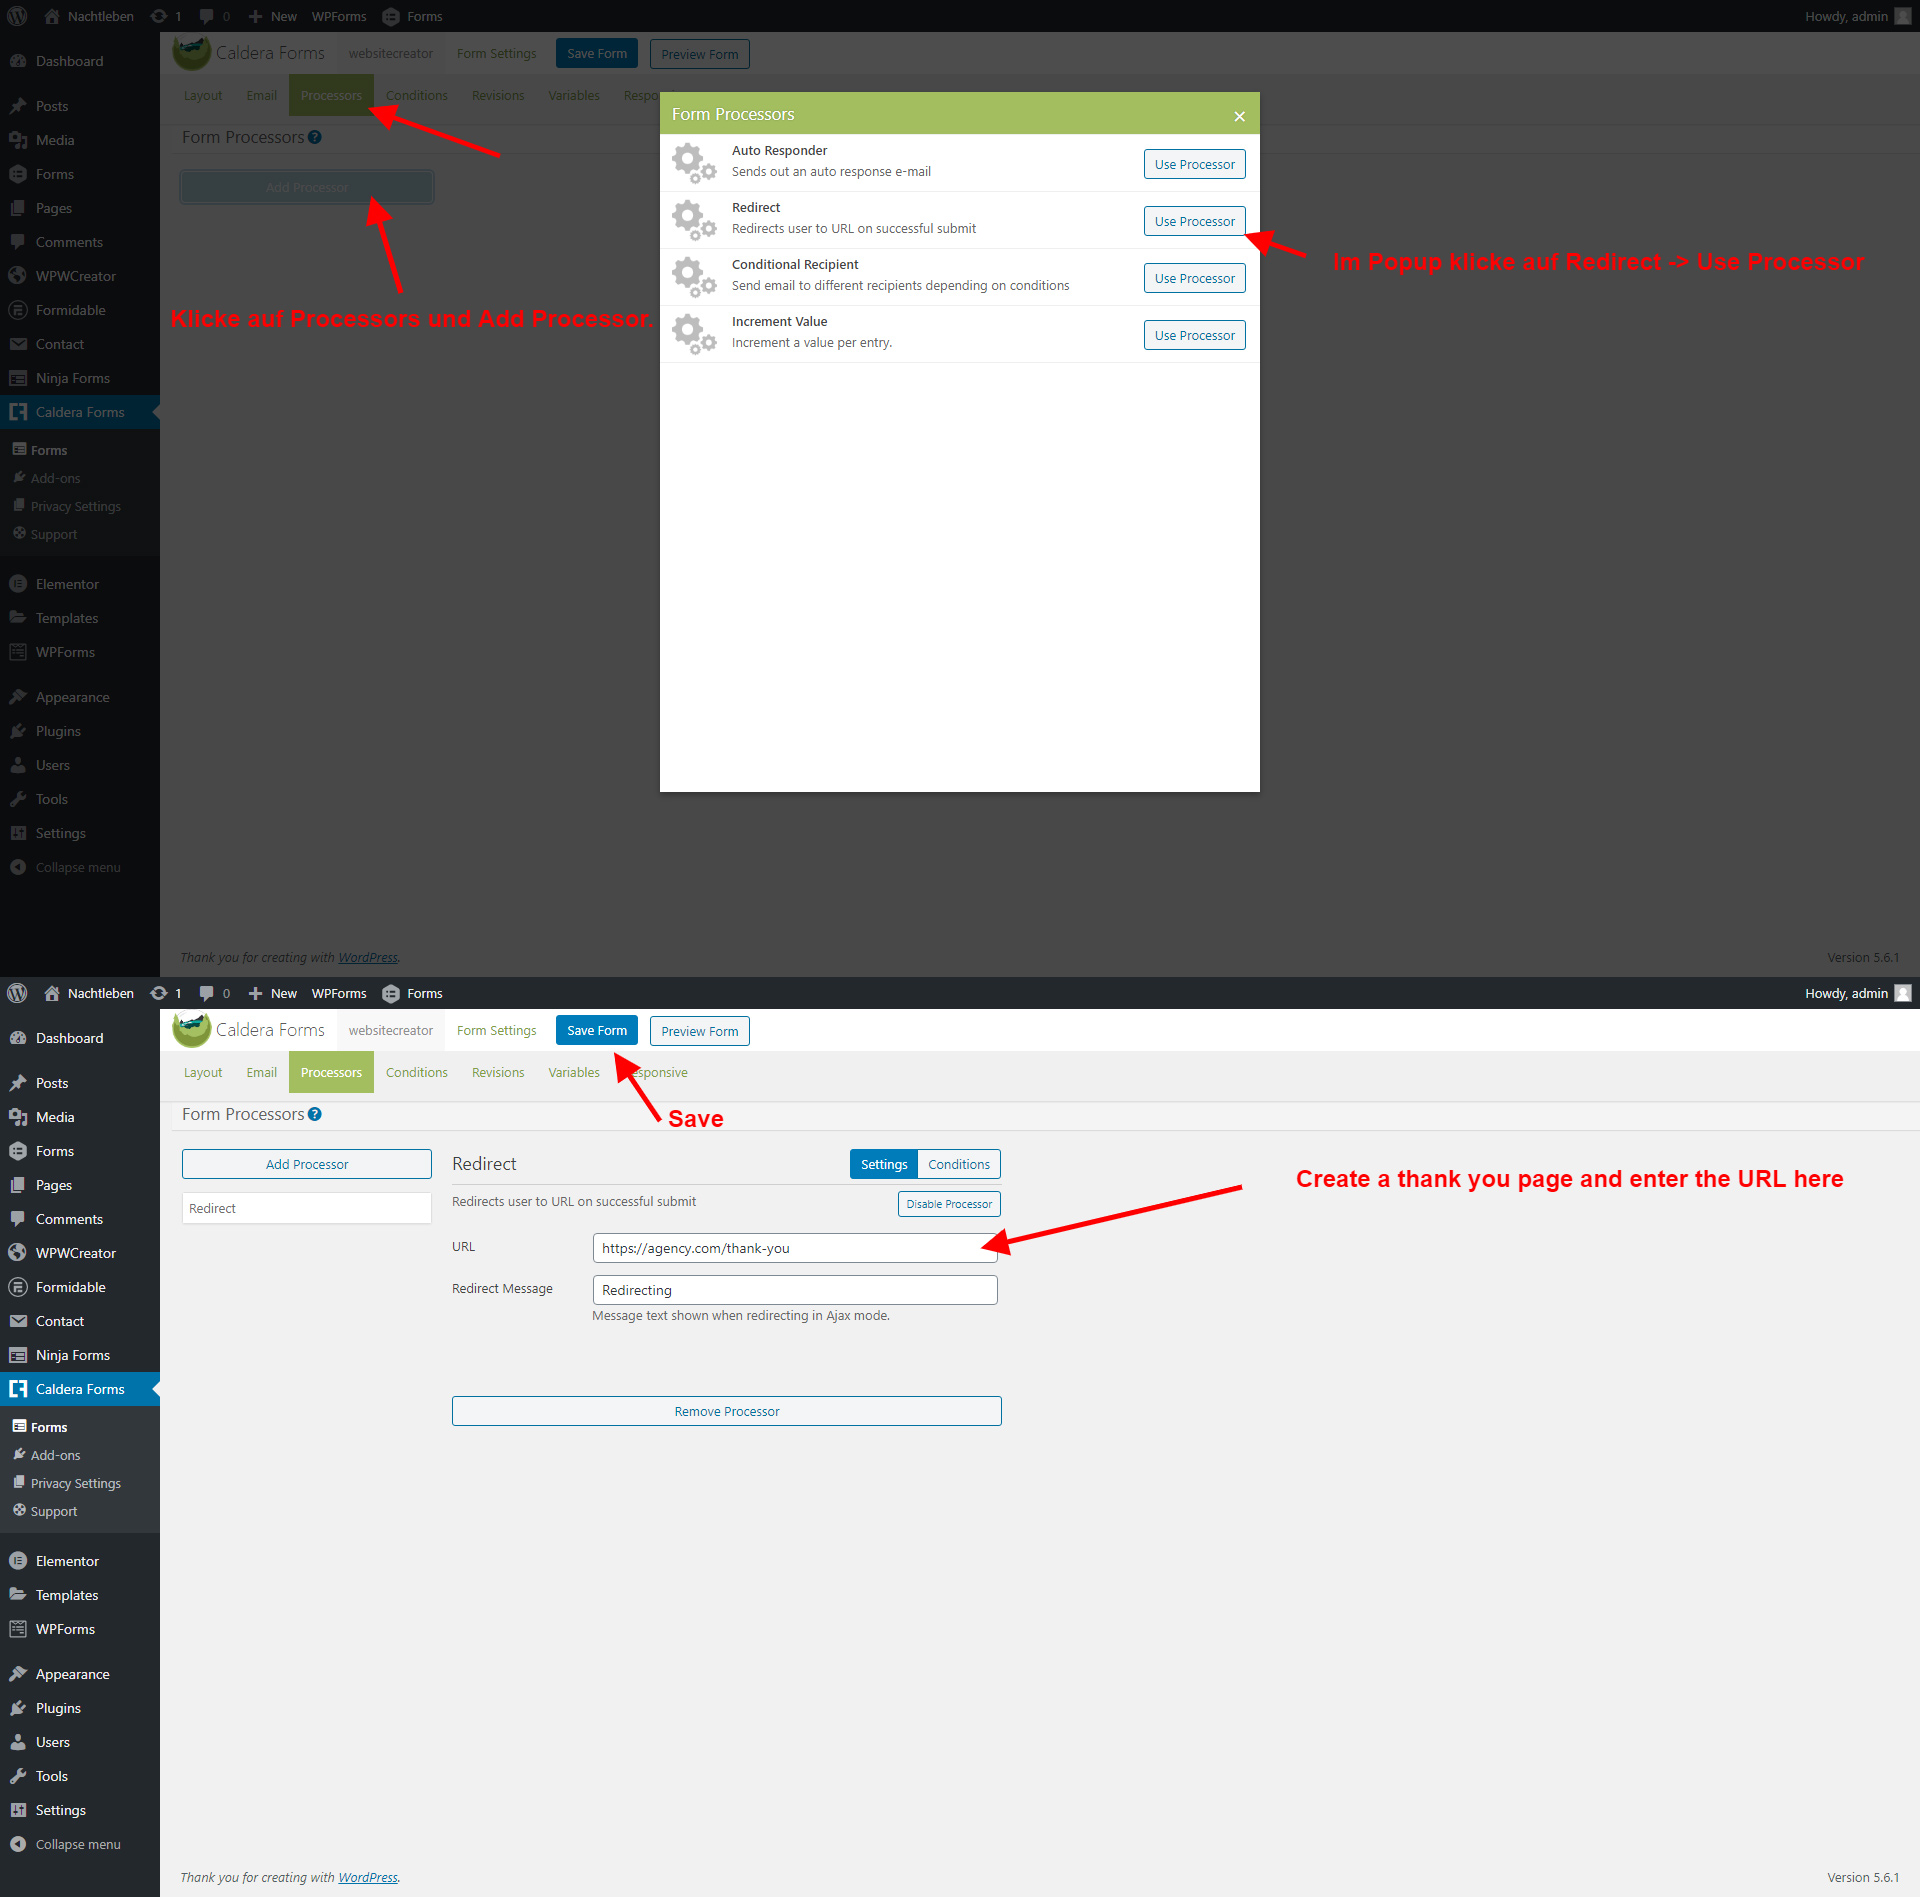
Step 3 : Add a redirect processor
  • Click on Processors and Add Processor.
  • In the popup click on Redirect -> Use Processor
  • Create a thank you page and enter the URL here

Email template for the access data email

As soon as your website is created, your customer will receive an email with the access data. You can design this email yourself.

Step by step:

Step 1 : Add a new template

In the "WPWCreator" section, go to "All Email Templates" and click on "Add New email template".

Step 2 : Set up the template with the placeholders
  • Give the template a name
  • Enter the email content
  • Enter the content that will be sent only to you
  • Enter the sending data
Step 3 : Test Email

Send a test email to yourself to see how the email looks like

Email template for the access data email

As soon as your website is created, your customer will receive an email with the access data. You can design this email yourself.

Step by step:

Step 1 : Add a new template

In the "WPWCreator" section, go to "All Email Templates" and click on "Add New email template".

Step 2 : Set up the template with the placeholders
  • Give the template a name
  • Enter the email content
  • Enter the content that will be sent only to you
  • Enter the sending data
Step 3 : Test Email

Send a test email to yourself to see how the email looks like

Email template for the access data email

As soon as your website is created, your customer will receive an email with the access data. You can design this email yourself.

Step by step:

Step 1 : Add a new template

In the "WPWCreator" section, go to "All Email Templates" and click on "Add New email template".

Step 2 : Set up the template with the placeholders
  • Give the template a name
  • Enter the email content
  • Enter the content that will be sent only to you
  • Enter the sending data
Step 3 : Test Email

Send a test email to yourself to see how the email looks like

Scroll To Top